


Quarantine Zone: The Last Check: Base Management, Tools, and Upgrades

Quarantine Zone: The Last Check’s gameplay contains several different elements, many of which centre around the inspection of survivors to ensure they will not be a risk to others or, even worse – a risk to you.
Throughout the course of your stay in the QZ, you’ll have to fight off the hordes of dead, inspect survivors using various tools, and manage your resources to try and keep as many people alive as possible. We shall cover all of that and more in our Quarantine Zone: The Last Check walkthrough.
Quarantine Zone: The Last Check – The Quarantine Zone

During Quarantine Zone: The Last Check’s story and endless mode, the main body of the game revolves around sending survivors to one of 4 locations in your quarantine zone:
- Survivors Block: If they show limited symptoms or are entirely clean, send survivors here for eventual evacuation. The more healthy survivors saved, the more upgrades you can purchase.
- Quarantine: If a survivor shows moderate signs of infection, or you are unsure of their status, send them here and monitor their progress or their decline. Be prepared to “clean” the quarantine cell if one of the survivors kept in there turns, it will be a grisly sight.
- Laboratory: Send a survivor here if they are showing a symptom you do not have on your list. You should unlock it as a noticeable symptom for further survivors. The experimentation process is lethal, so only use it if you’re sure the person is infected.
- Liquidation: If you’re positive a survivor is infected, either through an obvious bite mark or other fatal symptoms, send them here and try to view it as a mercy; they may still be useful later.
Quarantine Zone: The Last Check – Evacuation

Every five days in the Quarantine Zone: The Last Check’s campaign, you will be tasked with evacuating whatever survivors are still alive in your survivor block. Depending on how many you have, you can cash them in for either money or research points. You are only awarded these when reaching certain milestones of survivors, starting at 5 and ending at 22.
As such, a good strategy is not to evacuate all of your survivors if it wouldn’t help you reach one of said milestones; it may be cruel, but you’re going to need all the research points you can get. On that note, we would advise sending people to the military only if you’re incredibly desperate for cash. We found ourselves flush with cash more often than research points, so bear that in mind when choosing where to send survivors.
Additionally, if you have a zombified survivor encaged, the military will take it in exchange for cash. More on this later, but it is yet another reason to focus research points during evacuations.
Quarantine Zone: The Last Check – Base Management

Quarantine Zone: The Last Check’s resource management is actually far less of a concern than the game has you believe. At any point during gameplay, you can enter the build mode, which will allow you to inspect buildings, buy resources, and upgrade structures. The game is nice enough to have a drop-down menu to show you exactly how much is being consumed and how much you have in reserve.

As long as you keep on top of the numbers, you’ll have no issues. You may find yourself strapped for cash at some points, requiring you to think about which resources are more important. If this is the case, power is essential for all other buildings, so focus on that it’s also the cheapest to restock. However, this never happened to us in our playthroughs, as money is fairly abundant if you’re detail-oriented during inspections.
The upgrades to certain buildings are essential. We recommend upgrading the generator and quarantine cell as much as possible, as these are the two that caused us the most issues. You can also upgrade the inspection checkpoint, which should definitely be a priority – more on that later.
Quarantine Zone: The Last Check – Laboratory

When sending a survivor to the laboratory, you will enter a minigame in which you have to dissect them to find the target organ. It’s a very simple mini-game, as are many of Quarantine Zone: The Last Check’s minigames. All you must do is simply locate the organ highlighted green, maneuver your camera so that you are looking at it, and then extract.
More often than not, there will be a few other bones and organs in the way; simply laser those away to make a path to the target organ. Make sure not to laser any that highlight red when aimed at, as that will end the procedure and kill the survivor, losing whatever new symptom you would’ve gained.

After extracting the organ and putting it in the machine, a sample will come out. You then must put the sample into the analyzer on the desk, and if there is a symptom present that you did not have, it will be revealed to you and added to your list of possible symptoms.
If there’s ever a symptom that you don’t recognise immediately, send the survivor to the lab and execute this process, as having as many symptoms as possible available will net you the most profit when identified.

Additionally, within the laboratory is the cage. As previously mentioned, if a survivor turns while in quarantine, they can be sent to the cage. It is your task to keep this zombified survivor fed and alive until your next evacuation date, where you will be awarded cash for any zombified survivors sent. You must transport the corpses of liquidated survivors using a trolley next to the pile of bodies.
There is some fun to be had driving this thing around. It is secretly an incredibly useful tool, as you actually move faster when wheeling this around than you do when moving normally. Additionally, we experienced issues with Quarantine Zone: The Last Check’s sprinting, as occasionally the sprint button would be completely non-functional.
We noticed this happened specifically when using the devices in the lab. When this occurred, we used the trolley to get around the QZ, as it also has a sprint mechanic, which did work even when the normal running didn’t.
Quarantine Zone: The Last Check – Drone Sections

A few times throughout Quarantine Zone: The Last Check’s runtime, you will be woken up after finishing a day by an alarm and flashing red light. This signifies that you are about to enter one of the game’s drone sections, where you are tasked with fighting off an incoming horde of the dead.
These sections can be intimidating at first, but they’re actually quite easy. They are arguably easier as the game continues, as you unlock more abilities for the drone, which makes dispatching the horde a simple job.
You are given three weapons at the start: a 20mm minigun, a 105mm gun, and a rocket launcher. The small enemies can be taken out with a single shot from any gun, so use the 20mm to handle the small ones. It didn’t take us long to realise that the enemies have set paths which they all must go down, so be patient and wait for them to huddle in a line and mow them down with prejudice.
If a bigger zombie appears, use the 105mm gun to take them out in two or three shots, and if many zombies come out at once, use the rocket launcher, simple as that. Also present is the classic video game staple: explosive red barrels, but you should try to save those in case a few zombies manage to get through your barrage of bullets.
Later in the game, you unlock various explosive abilities, making these sections a walk in the park. Use them if you’re in a pinch, but the previously mentioned gun strategies should work.
When you complete one of these sections, you’re greeted with a green victory screen. Nothing too special about it, other than it kind of looks like a screenshot from the original prototype game.
Quarantine Zone: The Last Check – All Tools

Quarantine Zone: The Last Check’s tools are what you’ll be using for 90% of the gameplay. Other than your eyes, they will be the only way to identify symptoms and protect yourself. There are eight handheld tools in the game, and two are built into your checkpoint. We’ll go over them in order of appearance (mostly), but keep in mind that every single one of these will be used for each survivor in the endgame.
Thermopulsometer

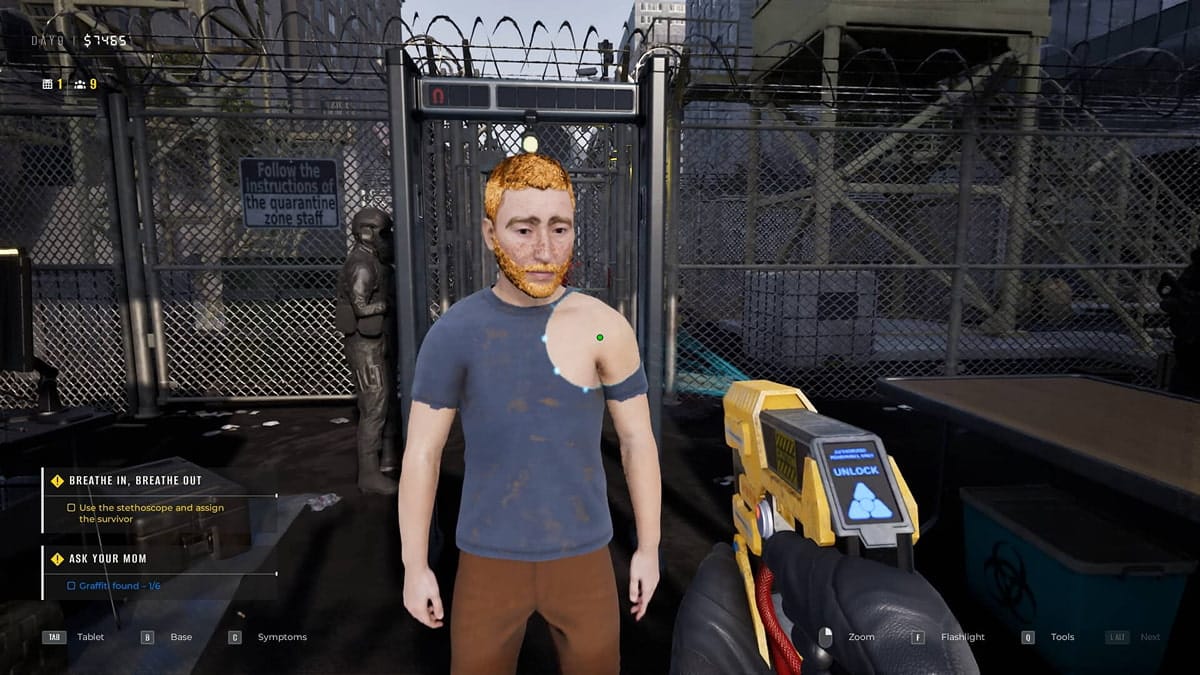
The first tool you unlock in the game, and what should always be your first check. It measures the pulse and temperature of survivors; if either is too high, that is a sign of infection. Depending on the severity, they should either be quarantined or liquidated. Its use is very simple, aim it at the survivor and their vitals will be read. Make sure to give it a few seconds to get an accurate reading.
Once upgraded, the tool will give a simple colour readout depending on how severe the symptoms are, as well as giving an audio cue. If you struggle to remember numbers as we do, we advise picking up the colour signal upgrade, as it will speed up every inspection.
Hammer

The second tool you unlock is the hammer. Despite it looking like a gigantic mallet when first picking it up, it is supposed to be a medical apparatus for testing reflexes. Not much to be said about this tool; it’s a hammer, you hit things with it. Make sure only to hit survivors in the knees or arms, as otherwise they may take damage.
That is, unless you unlock the later upgrade, which will knock out the infected when struck on the head. There are not many symptoms that appear with this tool. There are, however, several rats dotted around the QZ that you can smash with the hammer to get an achievement (you can guess how we figured this out).
Scanner

The scanner allows you to look through people’s clothing to find symptoms that their clothes would have covered up, bites and bruises, for instance. The scanner itself does not have any symptoms you can note; instead revealing symptoms already on the list that were previously hidden.
There are two upgrades available for the scanner: a wider cone and the ability to look through dirt and grime. The wider cone is much more useful, as looking over a person’s entire body with the scanner does take a while. However, being able to see through the dirt does make identifying symptoms easier.
Stethoscope

The stethoscope is used to find issues in the survivors’ lungs. Specifically, if they have any vacuous black spots. There are several severities of these black spots. However, only one spot will reveal the level of infection that any specific survivor has.
Make sure to keep an ear out, as the audio cues, as well as the severity of the waves on the stethoscope’s display is what give away the symptoms. It is also worth getting the upgrade, which colour codes the stethoscope to showcase the severity of the symptom. A later upgrade will remove all the black spots that do not reveal the symptoms, making this a particularly easy tool to use.
Syringe Analyzer

Arguably the best tool in the game, the syringe analyzer will instantly tell you whether or not a survivor is infected. The caveat is that it only has a limited number of uses, and they do not refill at the end of the day. In order to refill these uses, a zombified survivor must be sent off during the evacuation process.
We would suggest using this tool sparingly, as its best use is to free up space. We often found that our quarantine cell was always full, so using this on a survivor you’re unsure of can easily free up space for another survivor showing minor symptoms.
Pistol

This one doesn’t need any explanation; it’s a gun. Occassionally infected patients will become aggressive and attack you, when the shockingly useless guards with assault rifles fail to kill them, whip out your trusty piece and execute. You can also shoot zombies outside the QZ if inspection gets boring.
X-ray

The X-ray and the final tool are the ones that truly complicate the game. With the X-ray, you can see the survivor’s internals, which reveal several new symptoms.
Don’t worry about looking too deeply, as after a while, you tend to remember what a healthy set of organs looks like, and the internal symptoms are fairly obvious. Any discoloration or strange textures on the organs, and they’re likely set for liquidation.
Matioscope

Easily the hardest tool to use in the game, the Matioscope allows you to look into the eyes of survivors to look for microscopic signs of infection. They mention in a text box when you obtain this tool that survivors with drooping eyelids likely have some signs of infection present in their eyes, but they fail to mention that so can people without these eyelids.
When using this tool on a person’s eye, it will open up a new window where you can search around inside their eye. Here, you look for signs of infection listed at the bottom of the screen. Some are more severe than others.
However, several signs will likely be present in any given survivor. As such, this tool easily takes up the most time of any of them. While the upgrades do help with making the image clearer and allow you to move the camera faster, these are not as effective as the upgrades for the other tools.
Overall, this tool will consume much of your time once unlocked, as the viewable area is quite large. Additionally, there are several symptoms you need to note down, and a lot of them are easily missed. If you’re hunting for a perfect score, this tool will likely be your biggest hurdle.
Credit where credit is due, though, a fun detail is that if the patient is experiencing symptoms that affect the colour of their eyes, the background for this check will actually change to the corresponding colour.
UV Tower

The UV tower is the final diagnostic category you unlock. It is not a tool in the tool wheel; instead being a big red button in both the main inspection area and the quarantine cell. Once pressed, a timer will start, and UV lights will turn on. For the time these lights are on, certain symptoms will highlight green, and a green fog will surround the survivor.
These symptoms would not have been previously visible, and already visible symptoms will not glow. The game mentions that the reason for the timer is simply to preserve power and that you should use the UV tower sparingly. In our testing, it didn’t appear to actually affect your base’s power.
Whether or not we simply failed to notice the change, or this is just a way to make it so that players have an additional challenge of having a time limit, is unclear, but don’t worry too much about draining your power.
Contraband detector

Not exactly a tool, but worth mentioning is the scanner that all survivors walk through. Occasionally, a survivor will walk in with baggage (not emotional, literal baggage). There are a few items in the game that are considered contraband and must be either confiscated or, in instances of smuggled body parts, brought to immediate liquidation alongside their owner.
Through the base management and upgrade system, you can make additions to this scanner that will reveal whether or not a person is carrying contraband, and what symptoms to look out for. We found the symptom checker to be basically useless, as although it tells you what to look out for, other symptoms corresponding to the other tools can still appear. The contraband checker, though, is very helpful, especially when paired with the next mechanic.

Internal contraband is something that the X-ray tool is able to locate. However, that is not to say internal contraband is easy to locate. There are several layers within the X-ray tool, all of which have to be searched through in order to find any contraband. Luckily, with this scanner, if a survivor walks in with no baggage but still trips the alarm, you know they have internal contraband and can report it quickly.
There is also UV contraband, of which it is an instant liquidation, even if the item itself appears harmless. While all of these forms of contraband are either cause for alarm or simply require confiscation, there is a collection of items that should always be confiscated: the game’s collectibles.
Quarantine Zone: The Last Check – Collectables

The collectables are mostly found in survivors’ baggage when letting them through your checkpoint. It does not matter the ultimate fate of the survivor; the collectables, when confiscated, will appear in the collectables room, right next to the players’ quarters.
When a collectible item is on the table, it will glow. There will also be some particle effects that come from the item. The items themselves are quite hard to miss, as they’re usually brightly coloured, and the standard contents of the bags are usually repeated by multiple survivors, so the one-off items stick out.
Quarantine Zone: The Last Check – Bulletin Board Directives/Missions

Every day, Quarantine Zone: The Last Check’s bulletin board will have a new mission added to it. While these may seem intimidating, as most of them require you to pay extra attention to each survivor, they are actually shockingly easy. Many of them provide descriptions of the survivor to look out for, or the request is so ludicrous that you’d have to be actively trying to ignore them to fail.
Something we noticed in our playthrough is that most of the targets for these missions were actually at the end of the day, making them even more obvious. While some provided some challenge, such as “Find and kill three rats” (harder than it sounds), most of them we managed to complete accidentally, so don’t worry too much about these.
Quarantine Zone: The Last Check – Endings

After your final day on the job and one last drone section where the biggest enemies are introduced (handled much the same as the others), the game’s final day begins. There is no inspection on this day; instead, you talk to your commanding officer, who up to this point had just been a disembodied voice over a walkie-talkie.
He presents you with two options: leave the QZ for greener pastures and celebrate a job well done, or stay and continue the essential work. Neither endings add much in terms of content, though, as after selecting either one, the game simply rolls credits.
And there it is, everything you need to know to not only survive, but thrive, while also saving as many people as you can. Quarantine Zone: The Last Check’s price is currently just under $20, and for that, we do admit you get quite a hefty amount of content.
If youre a fan of similar investigative games such as 2013’s “Papers, Please” then we can recommend the game, even if, in its current state, it is a little janky. We hope this helped in navigating the many mechanics on show in Quarantine Zone: The Last Check, and hopefully you’ll put the knowledge to good use in trying to protect the last remnants of humanity.
FAQs
Does Quarantine Zone: The Last Check end?
Quarantine Zone: The Last Check has two endings, both revolving around whether or not you wish to stay in the QZ after the first month. The endings do not have many differences, however, as both cause the game to end quite abruptly.
Is Quarantine Zone: The Last Check multiplayer?
No Quarantine Zone: The Last Check is not multiplayer; it is also unclear as to if multiplayer would even work in this experience, although it isn’t hard to imagine goofing around with friends within the game’s map. Perhaps the modding community can do something about this.
Which games is Quarantine Zone: The Last Check similar to?
The most similar game we could think of would be 2013’s standout title Papers, Please. In which you are a border guard in charge of deciding who enters the fictional country of Arstotzka, similar to how you are in charge of dividing who enters the QZ here.
Who developed and published Quarantine Zone: The Last Check?
Quarantine Zone: The Last Check’s developers are a team called Brigada Games, who usually focus on game optimization and porting, with this being their first game posted to Steam. The publishers are far more established, Devolver Digital, publishers of such games as Hotline Miami and one of our personal favourites, Cult of the Lamb.
Top Adventure Games
More